Today's vehicles feature many kinds of illumination: Headlights, taillights, directional signals, and fog lights make it easier for you to see and be seen; overhead lights, map lights, lit glove compartments, and illuminated mirrors on sun visors all require attention periodically. In this section, I deal primarily with headlights and modern headlamps. If you experience problems with other lights, it's usually just a matter of changing the bulb or changing the fuse associated with the light. If that doesn't do the trick, seek professional help.
Remember: Older vehicles have headlights with sealed-beam units (bulbs). Modern vehicles have headlamps filled with halogen or Xenon gas. In the interest of brevity, where I refer to both systems, I just call them headlights.
Troubleshooting Headlights
Here are some headlight problems and how to tell what may be wrong with them:
- If a headlight doesn't work on Low beam but does work on High, you have to replace the whole sealed-beam unit or headlamp.
- If a headlight doesn't work on either High or Low beam, you probably just have a bad connection in the wiring.
- If both of your headlights go out at the same time, chances are the units are okay but the fuse that controls them has blown and needs to be changed.
Tip: It doesn't hurt to wash the outside of your headlights and taillights occasionally; clean lights provide better visibility at night. If you still have trouble seeing at night (and you've been getting enough vitamin A), check to make sure that both of your headlights are shining straight ahead rather than at the side of theroad or into the eyes of other drivers.
Determining Which Headlights You Have
Before attempting to replace or adjust your headlights, you need to know whether you have halogen or Xenon headlamps or the old-style sealed-beam units. You can tell which type of headlights you have by looking at themwhen they're on at night.
Headlights with sealed-beam units are quickly going out of style. The light they give off is just plain white. Many modern vehicles have halogen headlights. The newest models often come with HID (high intensity discharge lamps), also called Xenon or bi-Xenon lamps. Light from Xenon lamps has abluish cast.
If you're in doubt, check the clear outer cover of your headlamp assembly. If it's marked with D1R, D1S, D2R or D2S, you have HID lamps. (Those markings denote the type of bulb.) If the lens cover isn't marked and you still see a bluish cast to the light from the lamps, you either have an aftermarket Xenon system or a halogen bulb that's been tinted. Your parts dealer or service facility can tell which type you need by looking at the bulb.
Replacing and Adjusting Halogenand Xenon Headlamps
Although they are far more powerful than sealed-beam units and enable a driver to see 20 percent farther, these modern units require less power to operate. Xenon are the brightest, have the longest life, and consume the least power. Halogen and Xenon headlamps have also allowed designers to get pretty creative with shapes because they use small, replaceable lamps thatdon't have to be contained in round or rectangular housings.

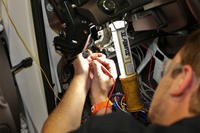
To replace a bulb on a halogen or Xenon headlamp, use Figure 6-10 as a guide while you take the following steps:
1. Make sure that your vehicle's ignition is off before you open the unit.
2. Open the hood and find the wiring leading to the electrical connector that plugs into the bulb assembly.
3. Remove the connector.
The connector can be held in place by a ring that unlocks by twisting it counterclockwise, by a little catch that you need to press down while pulling on the plug, or by a metal clip that pulls off (don't lose it!).
4. Pull out the bulb assembly, remove the old bulb, and install the replacement.
Caution: Don't touch the replacement glass bulb! Natural oils from the skin on your fingers will create a hotspot that will cause the new bulb to burn out prematurely. Instead, handle the bulb by its plastic base or the metallic tip, if it has one. Also, these fragile bulbs are filled with gas under pressure, so be careful to avoid breaking them.
5. Replace everything you removed and replug the connector.
6. Turn your headlamps on. If the bulb is still out and the fuse is okay, have a professional diagnose and fix the problem.
Caution: Because HID headlamps are so intensely bright, it's most important that they be properly focused to avoid temporarily blinding other drivers,pedestrians, or animals.
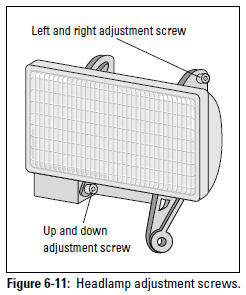
If you need to adjust the alignment of a halogen headlamp, it has two adjusting screws, as shown in Figure 6-11. The screw on the bottom will angle the beam higher or lower; the one at the top or side will focus the beam to theleft or right.
Replacing and Adjusting Sealed-Beam Headlights
Older vehicles have sealed-beam units, which are relatively easy to deal with. If one of your headlights ceases to shine, first consult your owner's manual to see whether it contains instructions for replacing the bulb. If it doesn't, the following steps should get you through the job with a minimum of hassle:
1. Make sure that the vehicle's ignition is off before you open the unit.
2. Remove any exterior rings or frames that surround the headlight.
If you need some exotic tool to do this, forget the job and have it done professionally.
3. Carefully turn the correct screws to loosen the retaining plate that holds the unit in place.
The plate has several screws; round headlights have three screws that loosen the plate, and rectangular headlights have four. The other screwsalign the headlights by adjusting the angle of the bulb.
If you turn the wrong screws, your headlights go out of alignment, socheck your owner's manual for details.
4. Remove the bulb.
If the retaining screws stick, spray a little penetrating solvent (like WD-40) on them. Hold onto the bulb as you remove the screws so that it doesn't fall out and smash. Pull the wiring connector off the back of the old bulb and set the bulb out of the way.
5. Scrape any corrosion off the connector, and check its wiring for wear.
If the connector is very corroded or the wiring looks bad, the problem with the light may be in the wiring rather than the bulb. You'll know for sure in a minute. . .
6. Plug the wiring into the new bulb, and insert the bulb into the receptacle.
Be sure to put the new bulb into its locking slots with the unit number at the top. Any small bumps you find on the back edge of the bulb should align with corresponding little depressions in the socket.
7. Hold the bulb in place while you put back the retaining plate. Then replace whatever trim surrounded the headlight.
8. Turn your headlights on. If the bulb is still out and the fuse is okay, have a professional diagnose and fix the problem.
Checking Headlight Alignment
If you managed to goof up your headlight adjusting screws, or if you just aren't sure whether your headlights are properly aligned, you can perform a simple check. When you're driving on a fairly straight road at night, see if your headlights appear to be shining straight ahead and are low enough to illuminate enough of the road in front of you to enable you to stop safely if an obstruction appears. Be sure to check your headlights on both high and lowbeams.
Tip: You can also have headlights checked and aligned professionally. Auto repair facilities often have headlight-aiming equipment to check and set your headlights in accordance with state laws. Some are certified Motor Vehicle Bureau inspection stations. Note, though, that if you go to a repair facility that does MVB inspections just to see whether your headlights are aimed properly, you'll probably have to pay them for checking the lights and for an inspection certificate whether or not they have to adjust your lights.
A cheaper way to check out headlight adjustment is to contact a highway patrol station. The station may have the equipment to check your headlights for you or be able to tell you where their current highway checkpoints are so that you can check the lights yourself. Of course, if the highway patrol finds that your headlights aren't in focus or finds anything wrong with your vehicle's emissions, you'll have to get the problem fixed within a stipulatedperiod or face a fine.
Tip: If you try to fix the alignment problem yourself by turning the adjustment screws on your headlights, go back to the checkpoint afterward for a certificate saying that the lights have been adjusted and meet the proper standards. This certificate is usually part of the price.
Replacing Directional Signals
Directional signals are usually easy to replace. On some vehicles, you have to remove the frame from around the signal to reach the bulb. On others, you can access the bulb from the trunk. If any of your directional signals stop flashing or don't flash in synch, or if the directional signal indicators on your dashboard don't flash, the signal lights themselves may not be malfunctioning.
From Auto Repair for Dummies, copyright © 2009 by Wiley Publishing, Inc., Indianapolis, Indiana. Used by arrangement with John Wiley & Sons, Inc.
")
")
")